For our first lecture we focused on the principles of animation and what we are going to be looking at in the module. The main aspect we focused on today was timing and squash and stretch.
What we will be looking at:
- Squash and stretch
- Timing
- Arcs and paths
- Aticipation
- Follow through and Overlap
- Walk cycles
- Lip sync
(this video has helped me sum up for me some of these concepts, this isn't my work)
Squash and Stretch:
Squash and Stretch is how a objects shape is distorted by external forces. In a practical exercise we did, we bounces balls to demonstrate this concept. As a ball hits the floor the ball squashes with the impact. We noted that no matter how much something squashes or stretches it still maintains its exact volume. It spreads out as much as it looses in height when squashed. Squash as stretch can be seen in for example the flexing of muscles and how they contract. The material of an object is reflected in its squash and stretch. A metal or wooden ball would not be expected to do this but a sponge ball defiantly would because of its flexible properties. When it comes to people a cartoon characters squash and stretch is greatly overexadurated to unrealistic proportions. Realistic human proportions don't squash and stretch in proportions but instead they show it in there muscles and build.

Edward Muybridge
Muybridge looked at animal movement and phases. He captures and animates the cycle of how different things move in motion. He used multiple cameras to achieve this.

Exercise:
Firstly we worked it groups to drop different balls and record the results such as time and number of bounces. We did this taking in the other elements and even experimented with different surface types such as a cushion.
Here are our video recordings:
In our exercise we made a ball animate and bounce in maya. Before we began we changed our preferences to 24 frames per second to capture it properly. 24 frames is the minimum for us where as in the states its 30 because of different equipment.
24 FPS - for Film/TV/Video
pal and NTSC is 30FPS
In order to animate, you create you object starting in frame one. You timeline is in a bar at the bottom. To save any changes move to a different frame and hit "s" to save it. A red mark should appear. To tweak these marks easily open up the chart that can be found in Window > animation renderers. The animation appears in chart for with a arc or straight line illustrating its movement. Because it was a bouncing ball it was easy to understand as each arc represents a bounce. After each bounce the arcs get smaller as it slowly stops. With each impact they repeat the same squash and stretch getting less and less as the height that it drops from each time get less reducing the strength of the impact.
Things to consider:
With an animation you have to consider additional elements that effect it. These include:
Gravity - how an object falls, how heavy is it? This is reflected by speed of fall and how quick it stops bounce. The concept of weight aid in understand what its made of.
Material - whats it made of so how much does it weigh
External Force - What additional contact does it have. Even things like air can influence direction.
Mass - Size?
Motivation
Timing - Again, timing tells alot about the size and weight of something
Lesson 2
In this session we learned about ghosting. Because of my experience with software like flash i'm fairly familiar with the concept and its use. In flash there is an icon and technique called onion skinning which allows you to see faint images of frames both in front of and behind a selected frame. This can also be adjusted to show more or fewer frames in front and back. In maya it's called ghosting.
Ghosting can be turned on by clicking on the ghosting icon found on the shelf in the rendering tab. It can be turned off again with the icon next to it. Ghosting is used to help aid the user in seeing the path of an animation. It helps to accurately aline and position animations with regards to other positions in the animation. By adjusting a frame in the path you can see how it effects other frames in between the other saved frames.
Other than position, it also can help show momentum and acceleration of something. It could also help with timing. This can be seen in the spacing of each ghost in the frames. As a motion speeds up the spacing becomes greater because its covering more space in a shorter time. When something slows down the gap decreases because it is hardly moving much each frame. So something that show gradual decrease in spacing is clearly slowing down. This is called splining.
This is also illustrated in the graph editor too but I find it easier to edit an animation if I can actually visualise the movement.
Lesson 3:
Objectives:
-Create and animate a ball bounce
-Animate using both a graph editor and ghosting techniques
-download rigged model (MAX) and play around with it
For creating a ball bounce we are to specifically use saved keys in 1,5,10,15,20.
From my experience there are 3 step to making a ball bounce. These are rules and instruction I have created for myself.
1. Start of by creating the highs and lows of each bounce. These are the main frames. In the case of this exercise everything with a 5 frame is hitting the ground and every multiple of 10 is at the peak of a bounce. In the graph editor it still looks like a smooth wavy line. After each bounce decrease the high of the next bounce to show it gradually slowing down. The number of bounces and the height it bounces is reflective of what its made of and how gravity acts on it. Also keep an eye on the distance its traveling. It should be more or less a straight line unless the ball is speeding up in distance as it bounces like say if it gets hit by a sudden wind. A trick I've learned is after creating the whole animation take the line that illustrates the distance its traveling between each frame and delete the keys in between the start and finish. The result is a ball bounce that doesn't speed up or slow down in distance. This only applies if no other elements are acting on it.
2. Break the tangents on the keys that hit the floor. This insures a sudden change of direction on impact and no loss of speed when descending or slowly speeding up when taking off again. The direction change is instant with no change of momentum.
3. Put key either side of the peek of each bounce to extend the length of air time at its peek. It should slow down even more before slowly falling back down again. In ghosting view you should see the spacing decrease as it approaches peak and the space out as it falls back down.
Another thing I learned during this lecture is how to change how many ghost frames you see. Under the animation tab, go to animate and select the options icon under ghost selected. Then in the options use the drop down and select custom frame steps and then input the number of frames you want to view on each side.
My Basic Ball Animation:
http://www.youtube.com/watch?v=i4y0DyWh9OA
My Second Final Ball Bounce Animation:
http://www.youtube.com/watch?v=fnCOtkhs1-U&feature=youtu.be
Lesson 4
Objectives:
- Using the Max rig make a walk cycle.
- Understand Ik and FK
For the walk cycle, you can break it down into 3 main parts per step. The contact, The pass and down.
1. When I start I save frames for the start and end of each step. This I call the down part when both feet are down, one in front one behind. I then do the same but the other way around. At the same time I save the hip frame to go up and down with the spread of the legs. The hip is the centre of all the control. The rig allows me to grab the hip and pull it down. The Rig is moved and animated by non render able parts called controllers which are linked into the limbs creating joints and bends. When moving the hip it comes down when the legs are spread and back up when the legs are closed or passing, creating a blobbing effect. At this point the legs slide back and forth on the same level as if its on ice.
2. The pass is between these saved frames when you give one leg some lift as it passes halfway to step out in front. When doing this I bend the foot down as he raises so that his foot doesn't come up flat and appear stomping. I do this for the other foots in its own passing frame after the previous step. I have to save a frame for each foot, as I save a frame for every component that does an action.
3. 1Frame before each drop frame I have the foot flick up slightly as it comes in to contact with the ground like a plane does when it lands.
4. The last part is clean up where I open up the graph editor and correct a few things and neaten it up so every step is the same. I also do this by going into the channel box and checking the figures in the translation. I also use the graph and dope sheets to correct timing and speed. Stretching it all out slows it down. I did this to slow down the walk because it looked like he was walking at running speed in an unrealistic fashion.

FK stands for forward kinetics. It means everything is controlled manually, moving each individual part. It works from target point put into the saved frames. It is more time consuming but produces more precise and something accurate results.
IK
IK stands for inverse kinetics. It is where and entire part is moves and the computer tries to understand and move everything between. Like for example moving an arm. Instead of bending each join like in FK, IK would bend the whole arm in response to you grabbing the end of the arm and pulling it around. It moves everything in response to what you move. It is faster to do but produces less accurate precise results. It is best served for simpler rigs and controllers where little is involved.

http://www.youtube.com/watch?v=6JMCaSA5JlU&feature=youtu.be
Lesson 5
Objective:
-Understand the importance of good line flow and what else makes a good character pose.
-Create 4-8 emotional drawing poses depicting a character displaying emotion or action.
-Sketch out 15-20 pages of observational drawing and thumbnail sketches planning for animation and stills task.
Flow Line
In today's lesson we talked about the importance of giving a character good line flow. Having good line flow helps demonstrates a good pose and showing potential action. Bad line flow results in confusion in reading the characters pose and what hes doing. Line flow in mainly drawn from the spine. It can arc back and forth to show movement.

A good way to test ones flow line is to silhouette the character. If the characters pose can be clearly read to the point you can see what hes doing or even how he is acting mean the line flow its good. In the case of 3d modelling this can be done by turning off the lights. With 2d animation it requires the characters be blacked up.
Exaggeration of Pose
In some cases its good to over exaggerated a pose even if going for a realistic movement as apposed to a cartoon one. This is to make an action more clearer and prevents the character appearing stiff and wooden. Even when standing still on the spot the character should show some slight dynamic.


Objective:
- Produce a 3 renders of an animation (side, front, pers)
- 1024 x 768 in Maya render settings at 25 frames per second
- Show any development sketches, reference and research
Brief:
In light of the upcoming Olympics we are to produce an animation acting out one of the games using the max rig. The animation must be as realistic as possible taking into account all the aspects we have learned about so far. It must be no more than 10 seconds but longer than 6.
For my animation I am going to do weightlifting. As far as actions go it has a lot of movement and poses as apposed to things like shooting and archery. From looking at videos it has a lot of expression too like in the face as they struggle under the weight.
Here are a few reference videos I have gathered to look at. I will then analyse the key poses and when they happen in time with the video and then mimic my animation to that time.
(1)http://www.youtube.com/watch?v=GUl7UqbL3uc
(2)http://www.youtube.com/watch?v=Z3Mo2U3Vlmk&feature=related
To further analyse the weightlifting, I will focus on each major step or frame and write up whats happening at each pint in detail. This could involve things like pose, expression, flow line, squash and stretch, timing, etc.
(1) Key Frames
0.26 - Starting position. Knees bent and wide. Man bends his back and arms reaching down to grab the weight. Back of the hands facing away.


After analysing my reference I began to plan my animation down on paper taking in every slight detail I could that would be necessary to show in my animation. This recording and planning is done with the 20 page observational and planning task set during week 5.

My first step what to plan out my key poses . These greatly differ from each other and show the main stages in the action. The weight lifting goes through 4 main positions as I noticed in the videos. They all go about the same method.
The first stage is lifting the weight onto the collar bones. At this point they go up and back down in a squatting action.
Second pose is them standing up slowly with the weight in the same position.
Third is a massive drop to give enough momentum and free movement in the arms to get up underneath the weight and push it up above their heads.
The final stage is again standing up with the weight in its new possion above the head.
I have decided not to include the extra part at the end where he throws down the weight because I consider it unnecessary and might make the video too long.
The main movement in the animation comes from the hip which is the centre of the body and controls the height. The next set of planning I did was to try represent the flow of height between the frames. I drew it out like the ghosting in maya to show the transition between the main frames, like how between the first and second key frame he gets up briefly before going back down into a squat.
The main line through the middle and head height helps me see the change. This line could be what the hip eventually looks like in the graph sheet.
Next I did the key frames again this time making it a detailed manikin to better reflect the positions rather than 2d stick men.
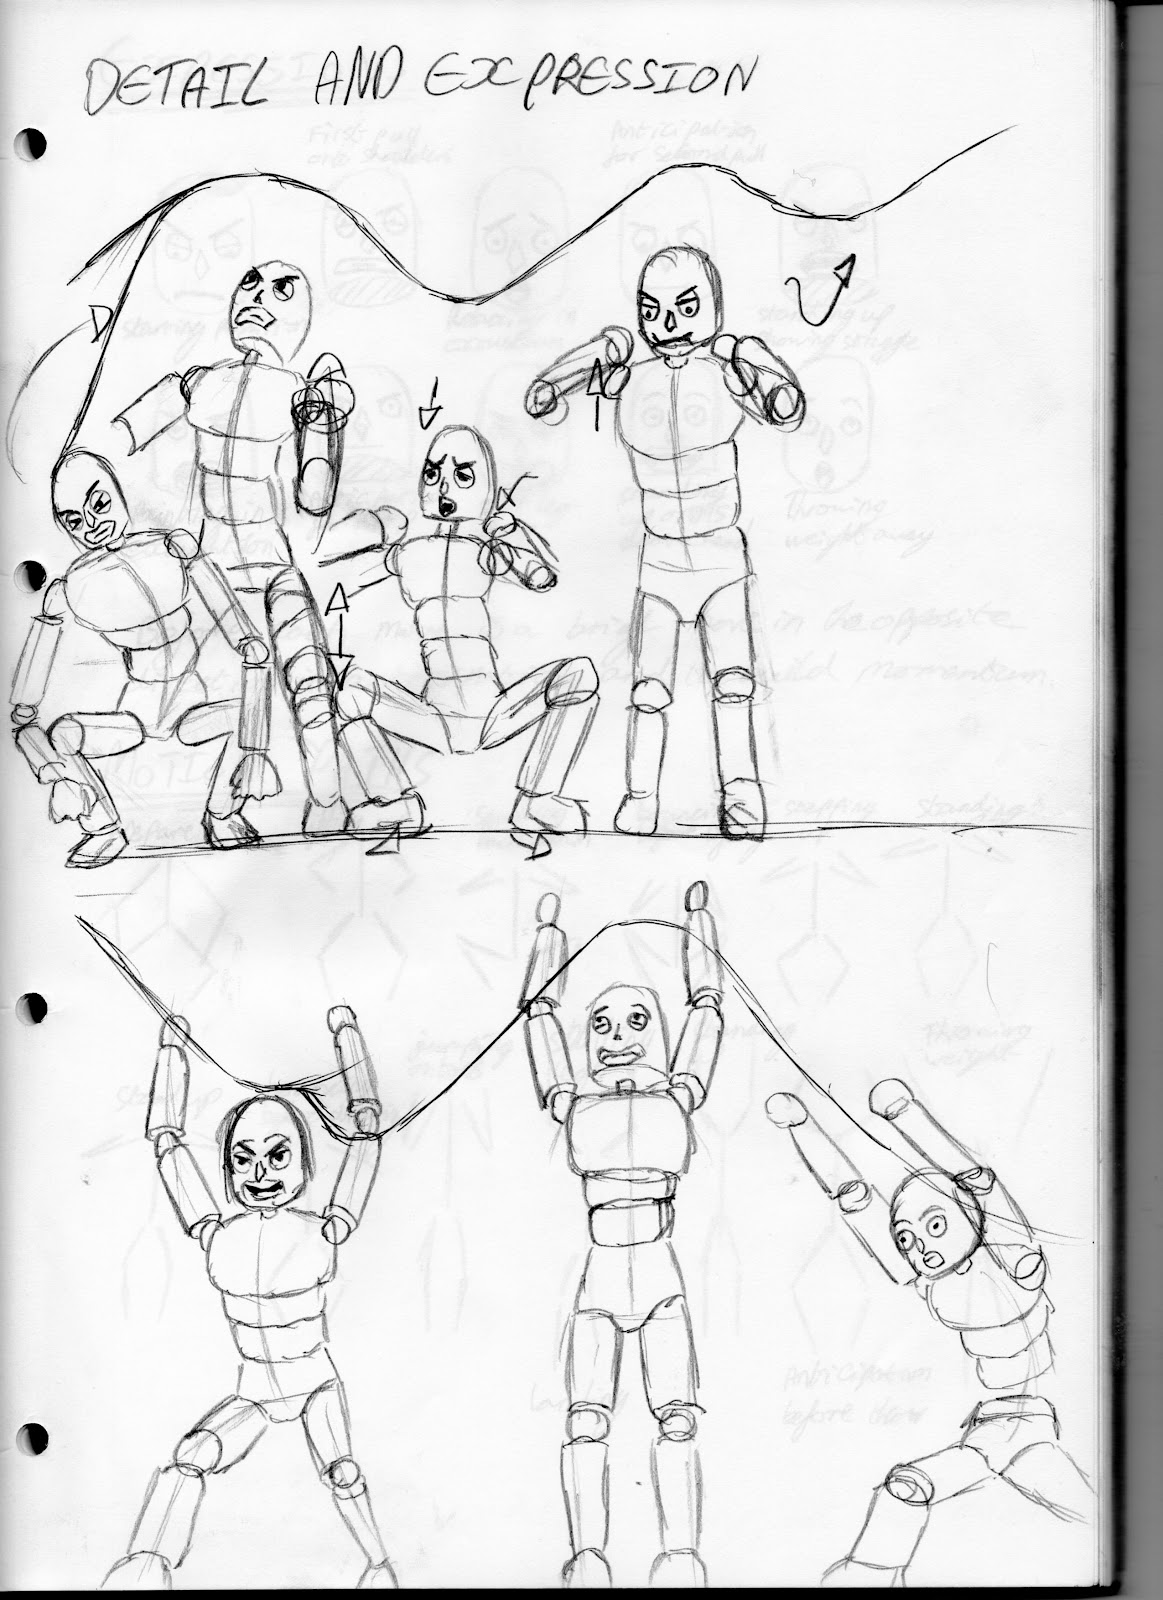
Here I have illustrated possible expressions that could occur in the animation. To make the animation more interesting and animated I have greatly exaggerated the expressions that are not like how the man acts in the reference videos. This is because I feel that expression says a lot about whats going on in the animation. If the face is plain and boring the viewer doesn't get a feel of whats going on. In my case with weight lifting the character is putting in a lot of effort to lift a heavy weight and shows signs of struggle. If the character has little to know expression then the view doesn't get an understanding of the effort and weight in the animation. The facial expression depict signs of effort when pulling, struggle when lifting and exhaustion when resting. I have considered what it would be like if I was lifting a heavy weight and what faces I would pull to make obvious signs about how I reacting to that current state.
For example:
Pulling up: tight lip, frown, concentration, focus
During pull: Bigger frown, Maybe gritting teeth under pressure, squinting?
Relaxing: Raised brows, wide eyes, heavy breathing, lungs inhaling and exhaling
Preparation: tight lip, frown, very deep breath
Extreme pain and effort: Hard frown, wide open mouth almost like yelling, tight shut eyes
ETC.

In addition I noted that the weight bends and flex's in reaction to the movement. It is a secondary movement that occurs after and action begins and follows through afterwards like its trying to keep up. I noted these down for latter. However in order to do this, I will have to rig my weight as well.

Another area which does a great deal of movement is the legs and feet. The feet have very specific positions thought the animation. The go in and out and even backwards and forwards to aid the balance of the man. I have sketched these out and added notes.


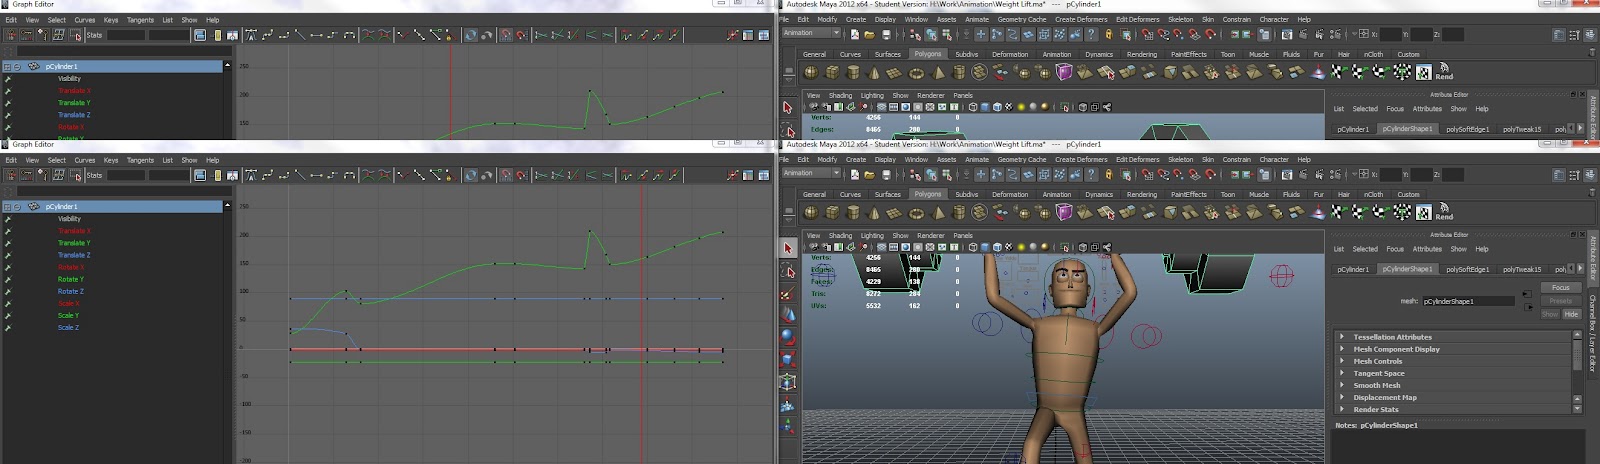
Here I have positioned my character in his key positions first, taking into account the hip being the main driving force. I later broke tangents at point where he drop to better show his weight giving way as he drops and relaxes into his squat. The same is done for the slit on the second drop.

When I first started to animate the arms I worked in FK, controlling each bend. However, after a while this caused several problems such as the orientations of the wrists. This resulted in some bizarre movements that are not illustrated on the graph. To correct this and did the arms again this time using IK which proved to be more effective and easier to use.

After I finished with the main body I moved on to put my main facial expressions in key frames.

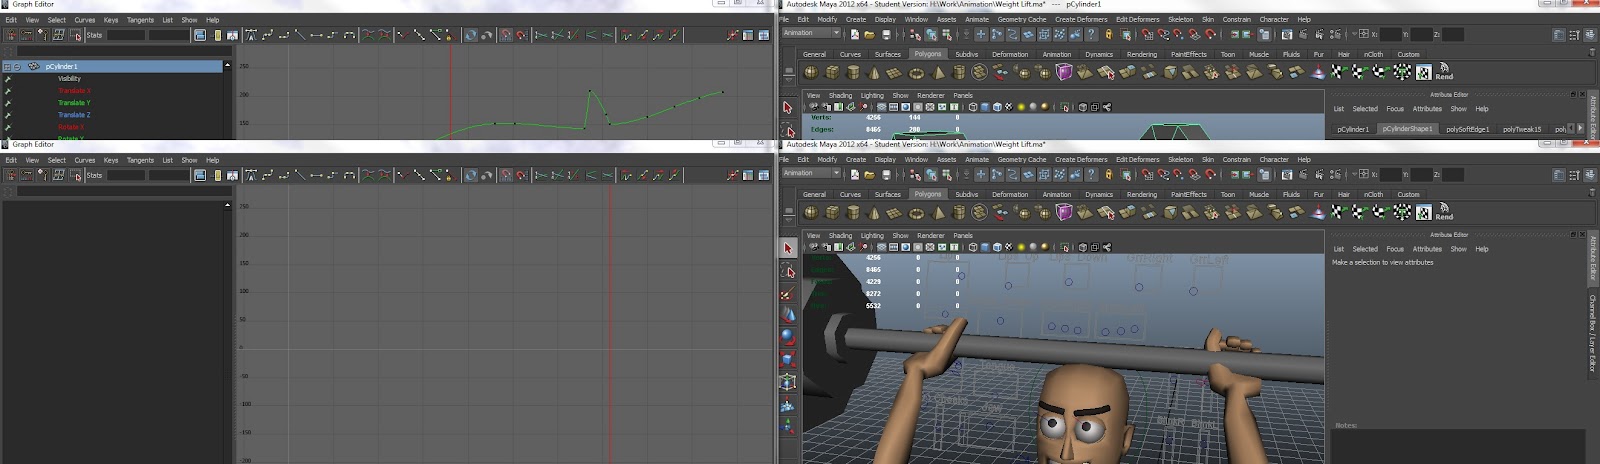
At this point I felt it necessary to add a un-rigged weight to help me picture my animation better. This then helped me correct and improve reactions to the strain and the spacing during stages of relaxing and giving way.
When adding in the in between frames I discovered I could further emphasise the pressure when he its stepping up. When each foot leaves the ground, the other foot applies pressure. As a result the hip slumps to the side to show the weight falling on that side. One thing I have yet to correct in how the feet quickly move into place. At this point the feet step up to casually like the weight has suddenly become nothing. In the reference video, the man stops his foot back down after each step to quickly regain footing to stop the weight falling on him.

I went back to work on my facial expressions and add in between animations. This worked best at the point where after squatting he take in a massive inhale before continuing. His mouth gets wide and his eyebrows raise before closing his month and puffing his cheeks.
My next step is to correct the timing and experiment with breaking tangents to improve my animation. I want to focus on the feet in particular as I had mentioned earlier. After this is all done I will look into polishing my animation as a whole, removing unnecessary keys and correcting minor problems such as how the weight occasionally passes thought the body.

As a little extra, I am going through each controllers graph and deleting all unnecessary keys. These are keys that either don't do anything or are accidentally created from saving keys. By doing this it not only makes my graphs neater but it also makes it easier to read and helps me see more clearly exactly whats going on. This will become very good practise for me and makes correcting animations and making changes easier.

Again I went over the dope sheet readjusting the timing. I still wasn't happy with the second drop. Despite breaking tangents he still came down too slow as if their was gravity pulling suddenly but overall not fast enough.
Lesson 5 task
Objectives
- 4-8 emotive drawing poses clearly showing emotional like happiness, sadness, depression, anger.
-20 pages of observational pose drawing and planning for animation.

I started out by forming poses using the max rig and lit them to appear as silhouettes. Ive done this to test if the pose is strong enough to tell whats going on and what he's trying to express without expression.

For this pose he is rubbing his cheekbone. This is usually a sign of thinking. His hip goes lump and rests his overhand on his thigh. This presents a rather relaxed pose.

For surprise, I needed to overexadurate because this pose could be mistaken for dancing and joy. I'm made him look off balanced in shock. Because of this his leg comes off the ground. His arms raised up high. To stop it being mistaken for dancing or joy Ive made it look as though is looking down rather than up. This wouldn't be seen in joy or dancing. He appears as though his is shocked by something on the ground. As such Ive also made it a low angle shot so it appears he's shocked by the camera.

Sneaking is a easier pose because its so unordinary and specific. He goes up onto his tiptoes and his body becomes scrunched and bent over. He looks over his shoulder to look suspicious.

Pain was easy to because of the obvious reaction to pain. He grabs his leg and arches back in pain. His mouth is clearly open wide to show screaming.

He has the same relaxed pose as thinking but instead he is putting his head into his had. This is clearly relatable to a negative reaction.


This was hard to make obvious because the limbs are very close together so there is very little space in between to form shapes within the silhouette.
Lesson 6
Objectives:
- Animate Max performing a jumps using a reference video to observe key frames and movement.

Reference video:
http://www.youtube.com/watch?v=Qgw7T1i8nOI&feature=related
My Final Jump Video:
http://www.youtube.com/watch?v=s14Q6YG-I1s&feature=youtu.be
Lesson 7
For this lesson we looked more into the walk cycle. Specifically we focused on the characteristics of different walks and what is suggested about the character. Walk can indictate the following:
-weight distribution: how heavy the character is. This links to the speed of a character and the effort needed per stride
- Mood: an example being if the character was in a temper, their feet would stamp and their speed is increased.
-Personality and though: long strides for excitement and pride, small tip toe steps for shyness or caution.
-Balance.
-Additional things like injuries.
We also went over the different key poses in a walk;
Contact: The feet are the furthest apart and the arms are positioned the opposite to the feet placement. so right foot forward, right arm back and vice versa.
NOTE: the foot in front points its toe up so the heel is the only thing in contact with the floor. The behind foot has its toes in contact with the floor and the heel is raised.
Recoil: One foot is fully placed and the other begins to raise. The arms are separate.
Passing: The feet pass each other and arms switch.
Highpoint: The next leg is being raised ready to go into the next contact pose.
Other things to note: The shoulders sway the opposite direction to the hips. The rotation of the hip is determined by the foot that has the least weight on it. In other works the foot that is raised. The hip slumps in the direction of the raised foot. This has a lot to do with balance and weight distribution. A the legs move back and forth so does the hip to accompany the chance of weight to the other leg. The shoulders help to counter balance by going in the opposite direction. The end result is a seesaw effect with shoulders and hips switching while always leaning in the opposite direction.

Lesson 8:
I am going to spend this week working on my research and sketching with cycles, animation and my Olympic animation. I have yet to make some of my videos into AVIs to show.
To help me make final improvements I found another reference video of a weight lifting animation done by someone else (NOT MY WORK):
http://www.youtube.com/watch?v=Kd2HofYrVTU&feature=fvwp&NR=1
MY FINAL WEIGHT LIFT ANIMATION:
FRONT:
http://www.youtube.com/watch?v=B7zyEzyXgME&feature=youtu.be
SIDE:
http://www.youtube.com/watch?v=kO9QXZW7FfU&feature=youtu.be
PERSPECTIVE:
http://www.youtube.com/watch?v=2vmk-A8TaEM&feature=youtu.be
Lip Sync
For the next animation we are to feature lip sync based on a audio file. This is supported by pose and face expression. Pose and expression says a lot about emotion and feeling as well as how something is said.
Primary actions are the like the key frames that capture the facial expression.
Secondary action is the mouth movement that should be done last because the facial expression is key to know how the mouth moves and say something.
Steps:
1. Key framing
2. Correct timing using dope sheet
3. In between movement and poses
4. Adjustments made by breaking tangents in graph sheet
Key framing comes with posing the face to form the key sounds.
Import Sounds:
File must in WAV format. Go file file> import and locate the sound file. When it is imported, hold right click on the time line and then select sound and click on the file.
Alternatively you can drag it from the desktop onto the time line.
Settings:
In setting preferences you must first have it in real-time (24fps) under the timer slider tab. Then click of 4x on the height. This will increase the size of the sound waves on the time slider which makes it easier to see the peeks of sounds change. This then makes it easier to time the key frame and form the main sounds.
Task five - Lip Sync Animation:
Create a short animation using a max rig and reference material provided to block out a characters diologue speech. I should be no longer than the sound bite and must be rendered as an AVI. Show planning and research in sketchpad and journal.
After animating the lip sync I am then going to animated the characters full body poses to support the expression and tone of the voice.
The sound bite Ive gone for is the "THIS...IS....SPARTA!!" quote from the film 300 in which a spartan king kicks a man down a hole in slow motion following the line. I hope to include this to support the audio clip I will still keep a file with just the lip sync separate.
I am going to start planning the animation of the lip sync. This time around I have a audio file to help me key point and time the frames.


When rendering it does not include to sound bite. This was especially a problem when uploading it to Youtube. To solve this problem, I opened up the animation in Windows Live Movie Maker and then added the original sound bite I used separately over top.
Lip Head animation:
http://www.youtube.com/watch?v=ow0UpGcE6v8&feature=youtu.be
Full Body Animation:
http://www.youtube.com/watch?v=-tUE1BhxJtw
Links:
www.11secondclub.com (reliable source for rigged models)
DailyWave.com